Municipal Training Module
Locating Leaks in Water Mains & Service Lines — With the Smallest Possible Dig
A field guide for city and utility leak detection technicians: how each survey, localizing, and pinpointing technology works, what an excavation really costs the city, and how to choose methods that keep damage to roadways, sidewalks, and concrete slabs to a minimum.

Training presented by
H2Leak — Hydrogen Tracer Gas Leak Detection
Meet the Hydro-Lok™ underground water pipe leak detector: a 5% hydrogen / 95% nitrogen tracer gas system that pinpoints leaks on plastic mains, deep lines, low-pressure services, and noisy city streets where acoustic tools struggle — sampling through pavement joints and small bar holes instead of broken pavement.
- Works on PVC, PE, ductile iron, copper, and AC pipe.
- Field-replaceable sensor and flex hose.
- Includes detector, sniffer probe, USB-C cable, field case, and manual.

Learning Objectives
After completing this module, the technician should be able to:
- Explain the difference between surveying (where are the leaks in the system?), localizing (which block or segment?), and pinpointing (exactly where do we dig?).
- Describe how satellite, metering/DMA analysis, noise loggers, listening surveys, correlators, in-pipe tools, and hydrogen tracer gas work.
- State the advantages, limitations, and typical cost of each technology.
- Itemize the full cost of a street or slab excavation — including restoration, degradation fees, traffic control, and lost pavement life.
- Choose a pinpointing method based on pipe material, diameter, pressure, depth, soil, and surface cover.
- Match pinpoint confidence to excavation method — keyhole/vacuum versus conventional open cut — to minimize pavement and slab damage.
The core idea: the leak detection crew decides how much pavement the city breaks. A confident pinpoint, verified with a second method, turns a lane-closure open cut into a small, precise opening — and every dry hole avoided saves a full round of excavation and restoration.
What an Excavation Really Costs
The pipe repair itself is often the smallest line on the invoice. Cutting, hauling, shoring, backfilling, and restoring the surface — plus the permanent damage a patch does to the street — usually cost more than the clamp or coupling.
Cost Components of a Street or Slab Excavation
| Cost Item | What It Covers | Typical Range / Driver |
|---|---|---|
| Saw cutting & pavement removal | Cutting and breaking asphalt or concrete, loading and hauling spoils | Asphalt removal about $3–$7/sq ft; concrete removal about $3–$8/sq ft |
| Excavation crew & equipment | Backhoe or vac truck, dump truck, operator and laborers, mobilization | Your utility’s crew rate × hours; rises sharply with depth and night/emergency work |
| Trench protection | Shoring, trench box, or sloping — required by OSHA at 5 ft of depth and deeper | Adds equipment, setup time, and a larger surface opening |
| Backfill & compaction | Select fill or flowable fill, compaction testing where required | Driven by opening volume and local spec |
| Asphalt restoration | Temporary patch, then permanent hot-mix patch or mill-and-overlay | Hot patch about $2–$5/sq ft; municipal resurfacing bids about $3.60–$8.30/sq ft |
| Concrete restoration | Replacing full sidewalk panels, curb, driveway aprons, or slab sections | Replacement about $6–$12/sq ft, usually to the nearest joint — far larger than the hole |
| Restoration overcut / T-cut | Many cities require the permanent patch to extend past the trench edge | Can more than double the restored area on small openings |
| Pavement degradation fee | Charge for the shortened life of the street after a cut | Example: San Francisco charges about $1.00–$3.50/sq ft depending on street age |
| Traffic control | Signs, cones, arrow boards, flaggers, lane closures, police detail | Per-day cost; multiplies every extra day or extra hole |
| Landscape restoration | Sod, irrigation, regrading in parkways and easements | About $600–$2,500 per site on residential frontage |
| Indirect costs | Service interruptions, boil notices, customer complaints, damage claims, other utilities hit | Rarely budgeted, always real |
Ranges are approximate U.S. figures compiled from 2025–2026 contractor and municipal sources (see Figure Sources at the bottom). Use your utility’s actual unit prices and crew rates for planning.
Every miss is a second full invoice. A dry hole doesn’t cost “a little extra digging” — it repeats the saw cut, traffic control, backfill, and restoration, and it adds another permanent patch to the street. Missing by 10 feet on a concrete sidewalk can mean replacing two extra panels.
Excavation Cost Calculator
Enter your utility’s numbers. The example values are placeholders to show the math — replace them with your own crew rates and local unit prices.
Restored area = (length + 2 × overcut) × (width + 2 × overcut). Pipe repair parts and labor are not included — this is the cost of getting to the pipe and putting the surface back.
The Municipal Field Workflow
Work from wide to narrow. System-level tools tell you where to send the crew; localizing tools narrow it to a segment; pinpointing tools decide where the saw cut goes.
- Quantify the loss SystemUse the water audit (AWWA M36 method), production vs. billed volumes, and night-flow data to estimate real losses and decide which pressure zones or district metered areas (DMAs) to work first.
- Survey for areas of interest SurveyDeploy noise loggers, AMI/DMA flow analysis, or a satellite survey to flag streets or clusters most likely to be leaking — before walking a single block.
- Localize the segment LocalizeListen on valves and hydrants, run a correlation between fittings, or step-test by closing valves to isolate which segment is losing water.
- Locate & mark the pipe SupportConfirm route and depth from GIS and as-builts, then with an electromagnetic locator, tracer wire, sonde, or GPR. Request 811 locates for all other utilities. You can’t pinpoint a leak on a pipe you haven’t located.
- Pinpoint PinpointChoose the method that fits the pipe and conditions — ground microphone, correlation, or hydrogen tracer gas sampled through small bar holes. Mark the strongest reading.
- Verify with a second method PinpointConfirm the spot with a different technology (e.g., tracer gas confirms an acoustic peak, or a ground mic confirms a tracer-gas high). Verification is what earns a small opening.
- Choose the excavation method ExcavateMatch opening size to pinpoint confidence: keyhole core and vacuum excavation for tight, verified pinpoints; conventional open cut only when the location or repair truly requires it.
- Repair, restore, and record Close-outPressure-test the repair, restore the surface to spec, and log the leak type, pipe material, and exact position in GIS — that history targets the next survey.
Safety first: Always request utility locates (call 811) before digging, drilling bar holes, or driving probes. Follow OSHA trench-protection requirements, set up traffic control to MUTCD standards, and follow the gas supplier’s handling instructions for compressed-gas cylinders.
Leak Location Technologies
Grouped by the job each one does. Survey tools cover miles; pinpointing tools cover feet. Most successful municipal programs use several together.
Satellite Radar (SAR) Survey
Synthetic aperture radar from orbit detects the signature of treated drinking water in the soil. The provider overlays the results on the utility’s GIS pipe map and returns “areas of interest,” typically a few hundred feet across, where field crews then pinpoint with acoustic or tracer-gas tools.
✔ Advantages
- Screens an entire city in one pass with no field time.
- Works regardless of pipe material or noise.
- Directs crews to the right streets, raising leaks found per crew day.
✘ Disadvantages
- Does not pinpoint — every area of interest still needs a ground survey.
- Needs accurate GIS pipe data.
- Recurring subscription cost; an Atlanta economic study found conventional acoustic surveys delivered higher net benefit over three years.
Best for: Large systems with high non-revenue water that need to decide where to send limited crews.
DMA Flow, Night-Flow & AMI Analysis
The system is divided into district metered areas with flow (and often pressure) monitoring at the boundaries. Minimum night flow — when legitimate use is lowest — reveals how much water is leaking in each area. Advanced metering (AMI) adds customer-side leak alerts and a clearer water balance.
✔ Advantages
- Tells you which area is losing the most water, and when a new leak starts.
- Measures results — confirms losses dropped after repairs.
- Largely uses infrastructure the utility already owns.
✘ Disadvantages
- Area-level only; no location within the DMA.
- Requires tight boundary valves and reliable meters.
- Setting up DMAs on an older grid can take significant effort.
Best for: Prioritizing areas and tracking water-loss reduction over time.
Acoustic Noise Loggers
Small acoustic sensors attach magnetically to valves or hydrants and record pipe noise during the quiet overnight hours. Software flags loggers that hear a steady leak sound; some systems correlate between adjacent loggers to estimate position. Loggers are either left permanently or moved block to block.
✔ Advantages
- Covers many miles with little crew time once installed.
- Catches new leaks early, before they surface or break.
- No excavation to install — mounts on existing fittings.
✘ Disadvantages
- PVC and PE mains need closer spacing and longer listening periods.
- Pumps, PRVs, and customer usage create false alerts.
- Only narrows to the area between loggers — pinpointing still required.
- Battery replacement, data management, and ongoing analysis.
Best for: Continuous monitoring of metallic distribution mains, especially in high-loss or high-consequence areas.
Listening Survey & Ground Microphone
Technicians listen on valves, hydrants, and meter setters with a listening stick or contact probe to find the loudest fittings, then walk the main with a ground microphone and amplifier, placing it on the surface at regular intervals. The loudest point over the pipe marks the leak.
✔ Advantages
- Non-destructive; line stays in service.
- Fast on metallic pipe at normal pressure.
- Works through asphalt and concrete.
✘ Disadvantages
- Traffic, wind, and nearby equipment mask the signal — often means night work on busy streets.
- Plastic pipe and low pressure produce faint or no leak noise.
- Sound peaks at fittings and bends can create false hot spots.
- Accuracy depends heavily on the technician’s experience.
Best for: Metallic mains and services at moderate depth, in quiet conditions.
Leak Noise Correlator
Sensors (accelerometers or hydrophones) are placed on two fittings bracketing the suspected leak. The correlator measures the time difference for the leak noise to reach each sensor and, using pipe length, material, and diameter, calculates the leak position between them.
✔ Advantages
- Objective, calculated position — less reliance on “ears.”
- Sensors sit on the pipe, so street noise matters less.
- Works under intersections, rail crossings, and buildings where you can’t walk the route.
✘ Disadvantages
- Wrong pipe length, material, or diameter entries shift the answer — old GIS records with unknown repairs are a common cause of misses.
- Plastic and large-diameter pipe limit sensor spacing (hydrophones help).
- Needs two usable access points.
Best for: Metallic distribution mains between valves and hydrants, and runs under obstacles.
In-Pipe (Inline) Acoustic Inspection
An acoustic sensor travels inside the live main — either free-swimming (a sensor ball carried by the flow) or tethered (drawn along by a small drogue and tracked from the surface). It hears leaks and gas pockets from inside the pipe, which is far more sensitive on large mains than listening from the street.
✔ Advantages
- Main stays in service — no customer outages.
- Finds small leaks on large-diameter mains that surface tools miss.
- Tethered systems report locating leaks to within about 18 in. — small enough for a targeted dig on critical mains.
✘ Disadvantages
- Needs suitable insertion and retrieval points (taps, hydrants, valves).
- Planning, mobilization, and specialist crews make it a project, not a daily tool.
- Generally not economical on small distribution mains and services.
Best for: Large transmission and trunk mains where a failure or an unnecessary dig is very costly.
Hydrogen Tracer Gas (5% H₂ / 95% N₂)
The pipe section is isolated between valves and drained or partially drained, then charged with a non-flammable mixture of 5% hydrogen and 95% nitrogen. Hydrogen is the smallest and lightest molecule, so it escapes at the leak and rises through soil and through joints and cracks in pavement. The technician walks the marked pipe route with a hydrogen detector, sampling at the surface, at pavement joints, and through small drilled bar holes. The highest concentration marks the leak.
✔ Advantages
- Works on all pipe materials — PVC, PE, and AC mains where acoustics struggle.
- Finds small, quiet leaks and leaks on low-pressure lines.
- Unaffected by traffic and street noise — daytime work on busy roads.
- Samples through small bar holes or existing joints, so the pinpoint itself does almost no damage to pavement.
- Tight, verifiable pinpoint supports keyhole or vacuum excavation instead of an open cut.
- Non-flammable, non-toxic, inexpensive gas from local suppliers.
✘ Disadvantages
- Section must be taken out of service and isolated — plan around customers and fire flow.
- Gas needs time to migrate (minutes to hours depending on depth, soil, and cover).
- Sealed pavement and slabs need small probe holes or sampling at joints.
- Gas can travel along trench backfill and surface away from the leak — grid the high reading to find the true center.
- Large-diameter mains require a lot of gas to fill.
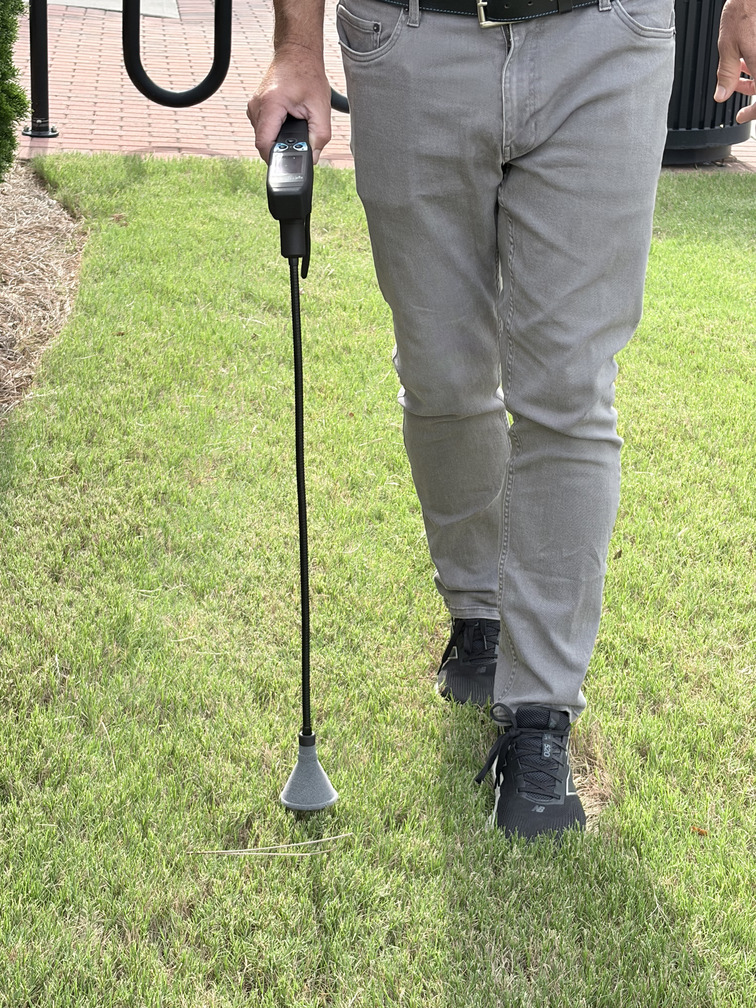
Best for: Plastic mains and services, quiet or low-pressure leaks, noisy streets, leaks under concrete slabs, and verifying acoustic results before the saw cut. See the wait-time reference for migration times by soil and cover.
Supporting Tools: Step Testing, Pipe Locating, GPR & Thermal
These tools don’t find the leak by themselves, but they keep the pinpointing tools on the right pipe and in the right segment.
| Tool | What it does | Limitation | Typical cost |
|---|---|---|---|
| Step testing / valve isolation | Closes valves in sequence while watching flow or pressure to find the leaking segment | Passing valves mislead; needs coordination with operations | Low — uses existing valves and gauges |
| Electromagnetic locator & sonde | Traces route and depth of metallic pipe or tracer wire; sonde locates plastic pipe from inside | Plastic needs tracer wire or sonde access; nearby utilities distort signal | $300 – $5,000 |
| Ground penetrating radar | Maps pipe (including plastic) and shows voids or saturated soil from long-running leaks | Indirect; clay and wet soils limit depth; specialist interpretation | $14,000 – $100,000, or contracted |
| Thermal imaging | Shows surface temperature differences from escaping water | Needs a temperature difference and shallow pipe; sun and rain create false patterns | $300 – $5,000 |
Method Comparison at a Glance
Use this table to match the technology to the job. “Surface damage to investigate” is the damage caused by the locating work itself — before any repair excavation.
| Condition | Satellite | Noise Loggers | Ground Mic | Correlator | In-Pipe | Tracer Gas (H₂) |
|---|---|---|---|---|---|---|
| Role | Survey | Survey / localize | Pinpoint | Localize / pinpoint | Pinpoint (large mains) | Pinpoint |
| Metallic pipe | Good | Good | Good | Good | Good | Good |
| PVC / PE / AC pipe | Good | Fair | Poor | Fair | Good | Good |
| Small / quiet leak | Fair | Fair | Fair | Fair | Good | Good |
| Low pressure | Fair | Poor | Poor | Poor | Fair | Good |
| Heavy traffic / noisy street | Good | Fair | Poor | Good | Good | Good |
| Large-diameter main | Good | Fair | Fair | Fair | Good | Fair |
| Under concrete / asphalt | Fair | Good | Good | Good | Good | Fair* |
| Pinpoint precision | Area of interest | Between loggers | A few feet (skill-dependent) | A few feet with correct inputs | About 18 in. (tethered) | A few feet; gridding tightens it |
| Line stays in service | Yes | Yes | Yes | Yes | Yes | No |
| Surface damage to investigate | None | None | None | None (uses fittings) | None (uses taps) | Small bar holes |
| Typical cost | Contract | Fleet investment | $2,500–$10,000 | $10,000–$35,000+ | Contract | $2,950 |
| Operator skill | Vendor-run | Moderate | Moderate–High | High | Vendor-run | Low–Moderate |
Ratings are general guidance; results vary with soil, depth, pipe condition, and equipment. *Tracer gas under sealed surfaces works best sampled at joints and cracks or through small drilled bar holes. Equipment costs are approximate U.S. prices as of 2026.
Choosing Methods to Minimize Pavement & Slab Damage
The size of the opening should follow the confidence of the pinpoint. The better the locate, the smaller the hole — and the smaller the hole, the lower the restoration cost and the less permanent damage to the street.
Keyhole Core + Vac
12–18 in. core, up to 24 in.A truck-mounted corer cuts a round coupon; a vacuum excavator digs to the pipe. The original core is bonded back in place. Needs a verified pinpoint within about a foot.
Small Vac Pothole
About 2 × 2 ftSaw-cut square and vacuum excavation. Confirms the leak before committing to a repair-sized opening. Good when the pinpoint is tight but not verified twice.
Repair-Sized Open Cut
Typically 4 × 6 ft and upNeeded for clamps and couplings on larger mains, or when shoring is required. Keep it on the verified spot rather than widening it to “find” the leak.
Exploratory Trenching
Open-endedDigging to search for a leak. This is the most expensive outcome and the one good leak detection exists to prevent.
Keyhole economics: industry sources report keyhole methods can cut excavation and restoration costs by up to about half, with core reinstatement costing under about $100 in materials and labor — no temporary patch, no repaving. But keyhole only works when the pinpoint is right the first time.
Practical Rules for Protecting Streets and Slabs
- Verify with a second, independent method before any cut in concrete or new asphalt. Acoustic and tracer gas fail in different ways, so agreement between them is strong evidence.
- Pinpoint first, then choose the opening. Don’t let the backhoe arrive before the locate is finished.
- Sample through joints before drilling. Tracer gas often vents at pavement joints, curb lines, and cracks — use them before drilling bar holes, and keep bar holes small and patched.
- Check street age and moratoriums. Many cities restrict or add fees for cuts in recently paved streets; the degradation fee is often highest on the newest pavement.
- On concrete, think in panels. Restoration usually runs to the nearest joint, so a 2-ft miss can mean a full extra panel. A tighter pinpoint pays for itself here.
- Grid the high reading. Tracer gas and sound both travel along backfill. Probe in a grid around the peak to find the true center before marking the cut.
- Log exact positions in GIS. Recurring leaks on the same segment are the evidence needed to plan a replacement instead of repeated street cuts.
Choosing a Method: Field Scenarios
Think through each scenario before reading the recommended approach.
8″ ductile iron main under a four-lane arterial
Loggers flagged the block. Traffic noise defeats a daytime ground mic, so correlate between hydrants to get a position, then confirm at night with a ground mic or by tracer gas at pavement joints. With two methods agreeing, use a keyhole core and vac to expose it before opening a repair-sized cut.
6″ PVC main in a residential street, quiet leak
Night flow in the DMA rose, but listening finds nothing — plastic pipe carries little sound. Step-test with valves to find the segment, isolate it, and pinpoint with hydrogen tracer gas through small bar holes along the located route.
36″ transmission main, can’t be taken out of service
A classic in-pipe job: the main stays live, and a tethered tool locates leaks tightly enough for a targeted dig. Satellite results or pressure data can help choose which reaches to inspect first.
Service line under a new concrete sidewalk
Short copper or PE service, sealed surface, and the city charges heavily to cut new concrete. Pinpoint with tracer gas sampled at sidewalk joints and the curb line, confirm with a ground mic if the service is metallic, and remove only the one panel over the verified spot.
Surfacing water at an intersection, source unclear
Water finds the easiest path, so it can surface far from the leak. Don’t dig where it appears. Listen on valves to identify the leaking main, correlate or use tracer gas to locate the actual leak, and GPR can check for voids before heavy equipment sits on the pavement.
Satellite survey returns 40 areas of interest
Treat each area as a search zone, not a dig site. Check fittings with a listening survey, correlate on metallic mains, and use tracer gas on plastic mains or where acoustics are inconclusive. Record which areas produced leaks to judge the survey’s value.
Common Mistakes to Avoid
Water travels along bedding and backfill. The wet spot is a clue, not the pinpoint.
Fittings, bends, and trench backfill create false peaks. Verify with a second method before cutting pavement.
Wrong pipe length, material, or diameter moves the calculated position — sometimes by many feet. Confirm records, especially where old repairs exist.
PVC and PE absorb leak noise. A quiet pipe isn’t proof of no leak — switch to tracer gas.
Deep pipe, clay, and pavement slow migration. Weak early readings often strengthen with time.
A few feet off the route weakens both acoustic and gas readings. Locate and mark first.
Scheduling an open cut before the locate is verified guarantees a large opening even when a keyhole would have worked.
Without exact positions and pipe details in GIS, the utility can’t justify replacing a segment that keeps getting cut.
Knowledge Check
Click each question to reveal the answer.
1. What is the difference between surveying, localizing, and pinpointing?
2. Why can a pavement restoration cost more than the pipe repair itself?
3. Why do acoustic methods struggle on PVC and PE mains?
4. What pinpoint confidence is needed before using a keyhole core?
5. Name two situations where hydrogen tracer gas is the better pinpointing choice.
6. When is in-pipe inspection the right tool?
7. Why can tracer gas or leak noise appear away from the actual leak?
8. What should be recorded after every repair, and why?
Glossary
- Area of interest (AOI)
- A zone flagged by a survey (often satellite) as likely to contain a leak; still requires field pinpointing.
- Bar hole / probe hole
- A small hole drilled or driven through soil or pavement to sample tracer gas closer to the pipe.
- Correlator
- An instrument that uses the time delay of leak noise between two sensors to calculate the leak position.
- DMA (District Metered Area)
- A section of the network with metered inflow and outflow, used to measure leakage by area.
- Forming gas
- A non-flammable mixture of 5% hydrogen and 95% nitrogen used as a tracer gas.
- Keyhole excavation
- Accessing buried pipe through a small cored opening (typically 12–18 in.) with vacuum excavation; the core is reinstated afterward.
- Minimum night flow
- The lowest flow into an area, usually overnight, used to estimate leakage when customer use is lowest.
- Noise logger
- An acoustic sensor left on a fitting to record pipe noise overnight and flag probable leaks.
- Non-revenue water (NRW)
- Water produced but not billed, including real (leak) losses and apparent losses.
- Pavement degradation fee
- A charge by the street owner to recover the shortened pavement life caused by a utility cut.
- Step test
- Closing valves in sequence while monitoring flow or pressure to identify the leaking segment.
- T-cut / overcut
- A restoration requirement that the permanent patch extend beyond the edge of the trench.
- Vacuum excavation
- Removing soil with air or water and a vacuum; also called soft excavation.